Cabinets are among the most dominant design features in kitchens, bathrooms, and even laundry rooms. They occupy visual and functional space, making their condition and color integral to the overall aesthetic of a room. However, replacing cabinets entirely can be a costly and time-consuming endeavor. Fortunately, there’s an alternative that can offer a transformative result at a fraction of the cost—cabinet painting.
In this comprehensive guide, we’ll dive deep into everything you need to know about cabinet painting: why it’s a smart choice, the process involved, tools and materials required, common mistakes to avoid, and how to ensure a long-lasting finish. Whether you’re a DIY enthusiast or planning to hire a professional, this article will serve as your go-to resource.
Why Cabinet Painting Is Worth Considering
Cabinets suffer from daily wear and tear. Grease, steam, fingerprints, and sunlight all contribute to the aging of the finish. When they begin to look worn or outdated, it can drag down the look of the entire room. While replacing them is an option, it’s not the only one—nor is it always the best.
Key Benefits of Cabinet Painting:
- Cost-Effective: Replacing cabinets can cost thousands of dollars. Painting them, on the other hand, typically costs a fraction of that.
- Customizable: With endless color options and finishes, painting allows full control over the style and mood of your space.
- Environmentally Friendly: By reusing existing materials, you’re keeping usable cabinetry out of landfills.
- Faster Turnaround: Most cabinet painting projects take just a few days, compared to weeks for a full remodel.
Is Cabinet Painting Right for Your Home?
Before jumping into a painting project, you should assess whether your cabinets are good candidates for repainting. Ideal candidates are:
- Structurally sound
- Made from wood or MDF (medium-density fiberboard)
- Free from significant water damage or warping
- Clean and grease-free (or can be cleaned)
Laminate cabinets can also be painted, but they require additional prep work and may not yield results as durable as wood.
If your cabinets meet these criteria, cabinet painting can provide dramatic and lasting results.
The Cabinet Painting Process: Step-by-Step
Whether you’re hiring a professional or tackling the job yourself, understanding the process will help you achieve a flawless outcome.
1. Planning and Preparation
Preparation is the key to any successful painting job—especially with cabinets, which face constant handling and exposure to moisture.
- Remove cabinet doors, drawers, and hardware. Label everything so reassembly is easier later.
- Clean thoroughly. Use a degreaser to remove grime, oil, and food residue.
- Sand the surfaces. This removes gloss and creates a surface the paint can adhere to. A 120–150 grit sandpaper works well.
- Fill any dents or scratches. Use wood filler, then sand again for a smooth surface.
2. Priming
Priming helps the paint stick better and last longer. It also prevents stains from bleeding through the new paint.
- Use a high-quality primer suitable for the cabinet material (wood, laminate, MDF).
- Apply a thin, even coat with a brush, roller, or sprayer.
- Allow to dry fully, then sand lightly with fine-grit sandpaper for smoothness.
3. Painting
Now comes the fun part—adding color.
- Choose a durable, washable paint, such as acrylic enamel or a cabinet-specific latex paint.
- Apply thin coats to avoid drips and streaks. Two to three coats are typically ideal.
- Use a high-quality brush or sprayer for a smooth, professional-looking finish.
4. Drying and Curing
Drying time varies by paint type and humidity levels, but most paints will be dry to the touch in a few hours. However, curing (the hardening process) can take up to 30 days. During this period:
- Avoid slamming doors or placing heavy items in drawers.
- Allow plenty of ventilation.
- Wait at least 48 hours before reinstalling hardware.
5. Reassembly
Once the paint is dry and cured, reattach doors, drawers, and hardware. Consider updating the knobs or pulls for a completely refreshed look.
Tools and Materials You’ll Need
If you’re going the DIY route, make sure you gather all the right supplies:
- Screwdriver or drill (for removing hardware)
- Drop cloths and painter’s tape
- Degreaser/cleaning solution
- Sandpaper or sanding block
- Wood filler (if needed)
- Primer and paint
- High-quality brushes, foam rollers, or sprayer
- Protective gloves and masks
- Paint trays and stir sticks
A well-equipped workspace makes the job smoother and improves the final result.
Choosing the Right Paint and Primer
Paint choice plays a significant role in durability and finish. Look for products specifically designed for cabinetry, which often feature enhanced adhesion, durability, and washability.
Best Primer Options:
- Oil-based primers: Great for stain-blocking and adhesion, but require strong ventilation.
- Shellac-based primers: Excellent at blocking stains and odors.
- Latex-based primers: Easier to work with and clean up, but may not adhere as strongly to slick surfaces.
Best Paint Options:
- Acrylic enamel: Provides a durable, washable surface with a smooth finish.
- Alkyd paint: A hybrid that combines the easy cleanup of latex with the durability of oil-based paint.
- Chalk paint: Offers a vintage look but may require sealing for durability.
Trends in Cabinet Painting
Today’s homeowners are moving beyond standard white cabinets. Here are a few popular styles and finishes in cabinet painting:
- Two-Tone Cabinets: One color for the upper cabinets, another for the lower.
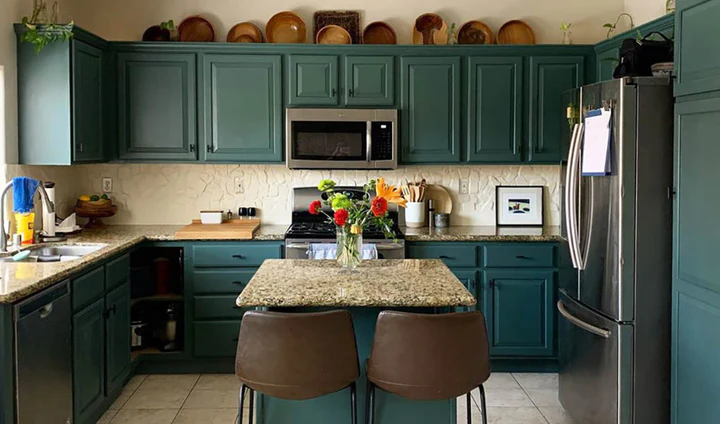
- Deep Blues and Greens: Sophisticated hues that make a bold statement.
- Matte Finishes: Sleek and modern, though they may show fingerprints more easily.
- Natural Wood + Painted Combo: Combine painted cabinet boxes with natural wood doors for a rustic-modern vibe.
Customization is the beauty of painting—whatever your vision, it can be achieved with the right paint and technique.
Common Mistakes to Avoid
Even experienced DIYers can fall into traps. Avoid these pitfalls for a professional-quality result:
- Skipping prep work: Poor surface prep leads to peeling and chipping.
- Using low-quality paint: Cheaper paints often require more coats and wear out faster.
- Painting in humid conditions: Moisture affects drying time and paint adhesion.
- Not labeling pieces: It’s easy to forget where each door or drawer belongs.
- Rushing the process: Let each coat dry fully to avoid smudging or uneven coverage.
Patience and attention to detail pay off in the long run.
Hiring a Professional vs. DIY
While painting cabinets yourself can save money, it’s also time-intensive and requires a certain skill level. Hiring a professional can be a smart investment if you:
- Don’t have the time or equipment
- Want a flawless, factory-like finish
- Have specialty cabinetry or materials
- Prefer speed and convenience
A professional painter will also handle cleanup and may offer warranties on their work. When choosing a professional, ask to see past projects, read reviews, and get a detailed estimate before committing.
How to Maintain Painted Cabinets
Once your project is complete, proper maintenance will keep your cabinets looking fresh:
- Clean regularly: Use a mild soap and damp cloth—avoid abrasive scrubbers.
- Avoid water damage: Wipe spills quickly, especially near sinks or dishwashers.
- Use cabinet bumpers: These soft pads prevent paint chipping from frequent use.
- Touch up as needed: Keep leftover paint for minor touch-ups.
With care, painted cabinets can look beautiful for years without needing another full refresh.
Final Thoughts
Cabinet painting is one of the most effective ways to rejuvenate your kitchen, bathroom, or workspace without the expense of a full remodel. With proper planning, the right materials, and either a steady hand or professional help, you can completely change the look and feel of your space in just a few days.
Whether you’re aiming for a cozy farmhouse kitchen, a sleek modern bathroom, or a colorful utility room, cabinet painting offers unmatched versatility and impact. It’s a smart, sustainable, and stylish choice for today’s homeowners.